Resize & Optimize Images
Lime CRM can automatically resize and optimize images before they are uploaded, directly in the end user's browser. This lets you keep stored files small and consistent — for example turning a large photo straight from a phone into a compact, square profile picture — without any manual work from the user.
What it does
When these options are set on a file field, a supported image the user selects is resized and re‑encoded on their own device, and only the smaller result is uploaded. The original, full‑size file never leaves the device.
This is useful when you want to:
- Save space in the cloud by storing smaller files instead of large, high‑resolution photos straight from a phone or camera.
- Speed up uploads and reduce memory usage on the user's device, especially on slow connections.
- Optimize images for a specific purpose, such as cropping every photo into a consistent square avatar for use as a profile picture.
Everything happens in the browser
Resizing and re‑encoding run entirely client‑side, before upload. Nothing is sent to the server to be processed, and the user's original file is never uploaded when resizing is applied.
Where to find the settings
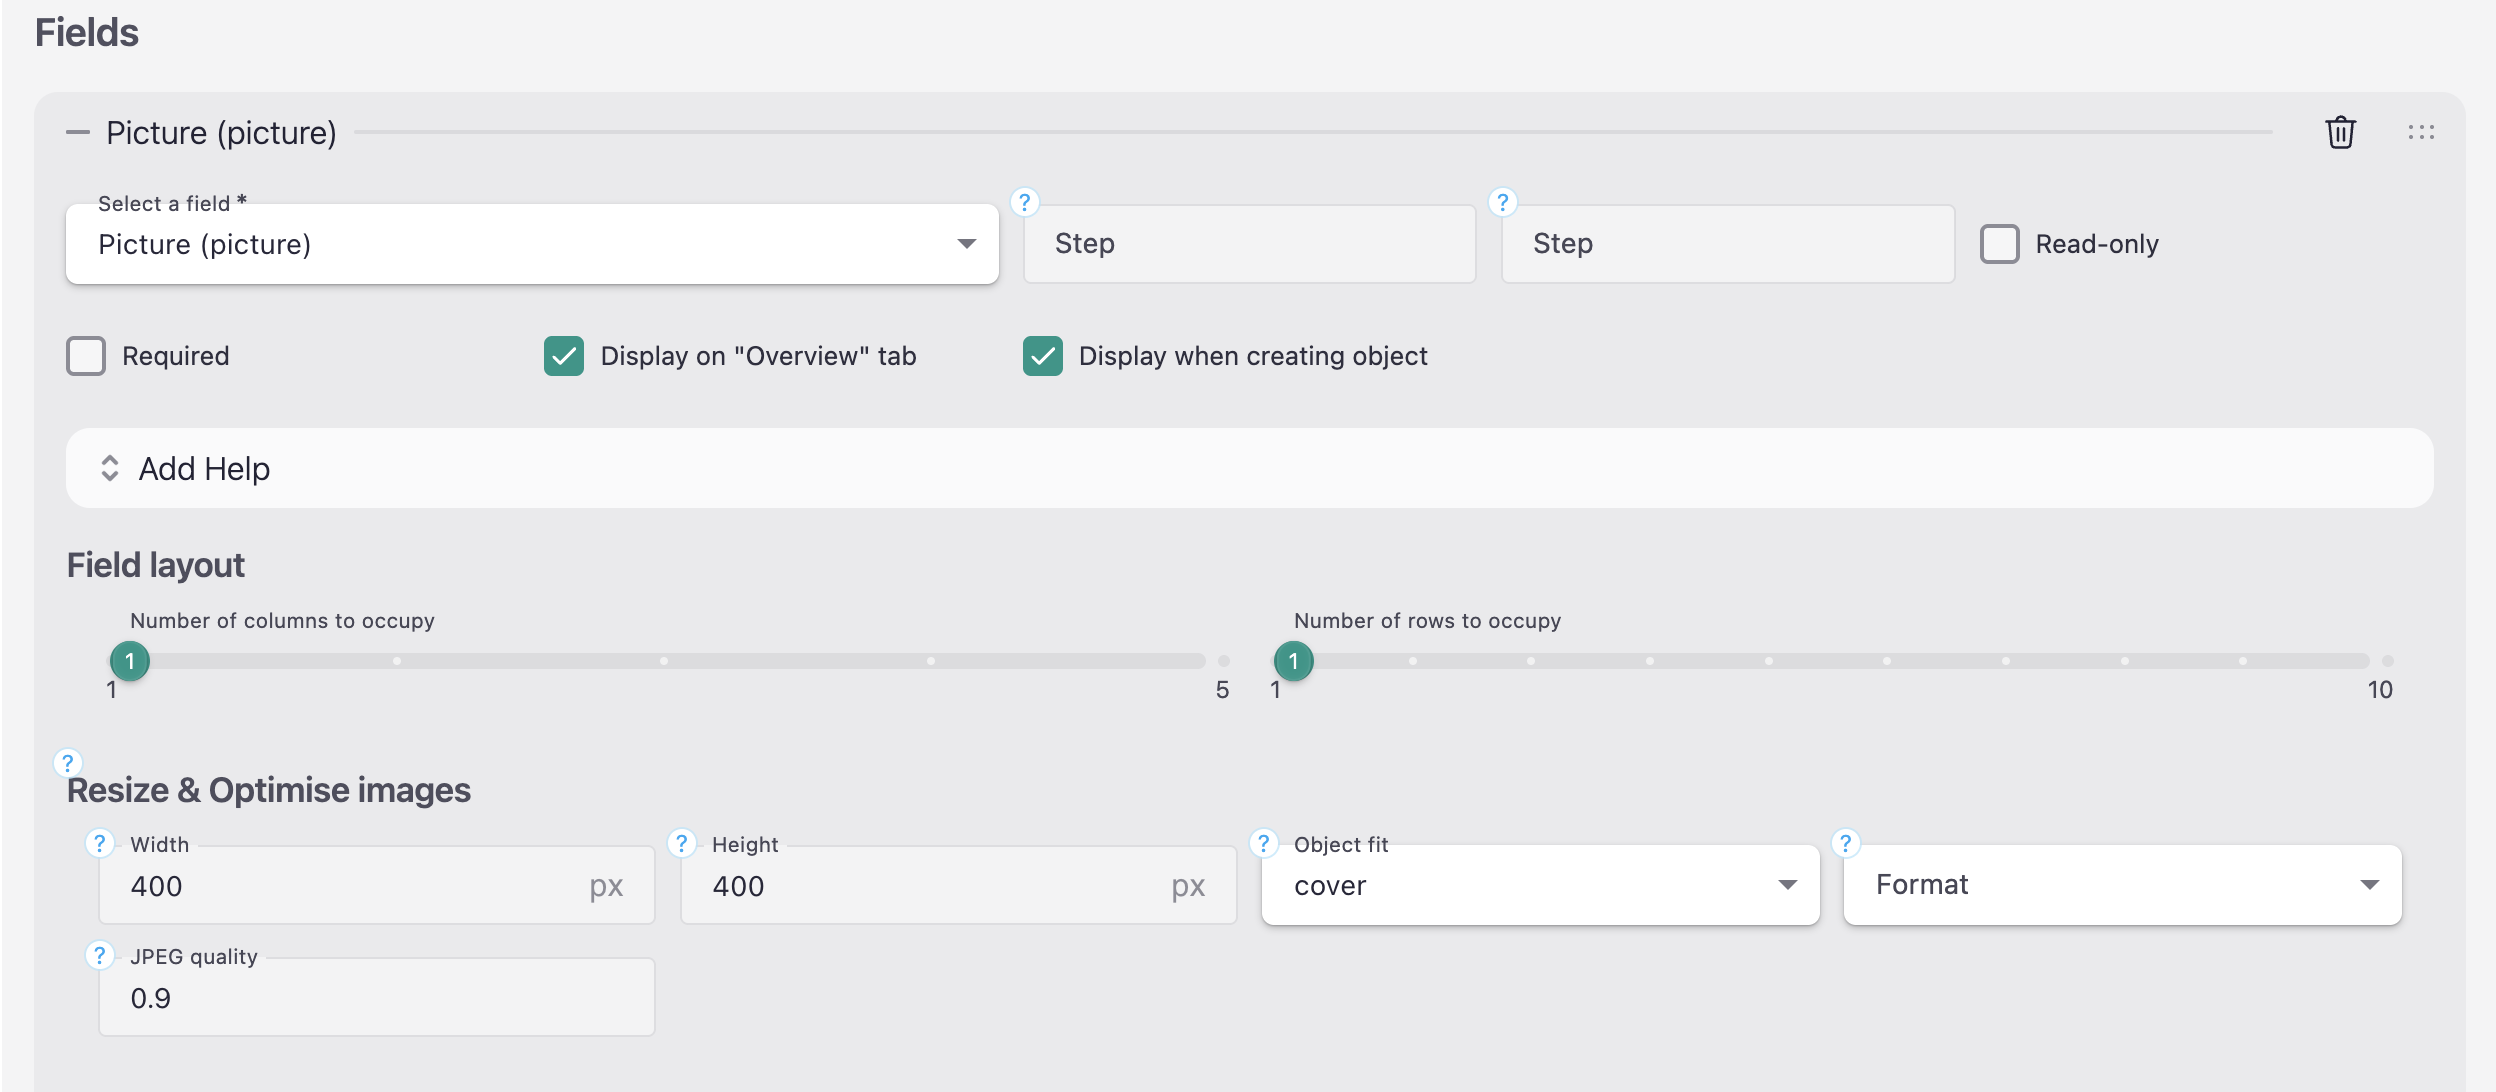
The settings live on file fields (properties of type file) in a limetype's object card configuration, in Lime Admin. Open the card configuration, expand a file field under Fields, and you'll find a Resize & Optimize images section.
A typical example is the Picture field on the Coworker limetype:
Only file fields
These options are only available on file properties. They won't appear on text, number, relation or other field types.
The options
Every option is optional. Set only the ones you need — anything you leave blank keeps the source image's own property rather than forcing a value. If you leave the whole section blank, files are uploaded completely unchanged.
| Option | What it controls | Leave blank to… |
|---|---|---|
| Width / Height | The target box, in pixels, the image is fitted into | Derive the missing side from the other (keeping the aspect ratio); leave both blank to keep the source size and only re‑encode |
| Object fit | How the image is placed in the box when proportions differ | Scale the whole image to fit without cropping |
| Format | The output file format | Keep the source format where possible |
| JPEG quality | How much a JPEG is compressed | Let the browser choose the compression level |
Width and Height
The Width and Height define, in pixels, the box the image is fitted into. Together they set the target size of the resized image — smaller boxes mean smaller files and faster uploads.
- Leave one blank to calculate it automatically from the other, keeping the image's original proportions. For example, setting only a width of
800scales the height to match. - Leave both blank to keep the image's original dimensions and only change the format or compression (an "optimize, don't resize" setup).
- For square avatars, use the same value for width and height (for example
400×400).
How the image is placed inside this box is controlled by Object fit.
Maximum size
The largest allowed value is 8000 px. Because resizing happens in each end user's browser, larger values could use enough memory to crash the browser tab.
Object fit
Object fit decides how the image is placed inside the width × height box when its proportions differ from the box. It only has an effect when both width and height are set; with only one set, the image keeps its proportions and nothing is cropped.
- cover fills the entire box and crops away whatever doesn't fit. This keeps the box completely filled with no empty space, which is ideal for square avatars and profile pictures.
- contain scales the whole image to fit inside the box without cropping. Nothing is cut off, but empty padding may appear around the image to preserve its proportions.
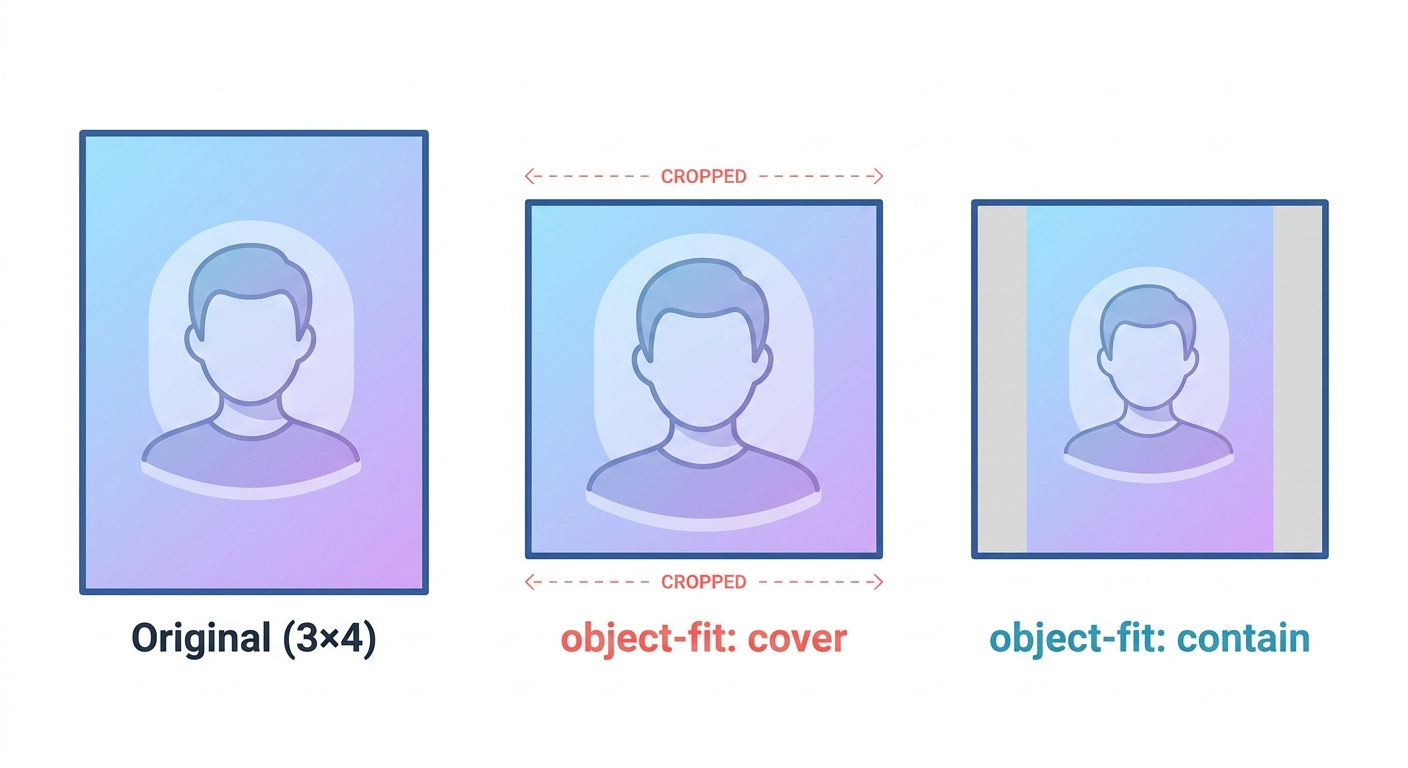
Leave it blank to scale the whole image to fit without cropping (the same as contain).
Format
Format is the image format the file is converted to before upload.
- JPEG produces small files and is the best choice for photos and profile pictures. It doesn't support transparency, and it lets you tune the JPEG quality to trade file size against sharpness.
- PNG is lossless and keeps a transparent background, which suits logos and graphics. Files are usually larger than JPEG.
Leave it blank to keep the original file's format where possible: a PNG stays a PNG (so transparency is preserved), and any other format is saved as JPEG.
JPEG quality
JPEG quality controls how much a JPEG is compressed, as a value between 0 and 1. Higher values keep more detail but produce larger files; lower values save more space at the cost of sharpness. A value around 0.8–0.9 is a good balance for most photos and profile pictures.
This setting only affects JPEG output — either when you set Format to JPEG, or when Format is left blank and the uploaded file is already a JPEG. It has no effect on PNG images, which are always lossless, so it's safe to set even when you don't choose a format.
Set a value for predictable results
If you leave JPEG quality blank, each user's browser picks its own compression level. This varies between browsers and is usually high, which can produce larger files than you expect. Set an explicit value (for example 0.8) when you want a consistent, predictable file size across all users.
Coworker profile pictures
A very common use case is turning coworkers' uploaded photos into clean, consistent profile pictures. Photos taken on a phone are often several megabytes and have all sorts of dimensions — not ideal for an avatar shown at a small, fixed size throughout the CRM.
For a great end‑user experience, configure the Coworker Picture field like this:
| Setting | Value | Why |
|---|---|---|
| Width | 400 |
A square target that looks crisp everywhere avatars appear |
| Height | 400 |
Same as width, for a perfect square |
| Object fit | cover |
Fills the square and center‑crops the overflow, so every avatar is consistently framed with no empty padding |
| Format | JPEG |
Compact files, ideal for photos |
| JPEG quality | 0.8 |
A strong balance between sharpness and file size (0.8–0.9 is the sweet spot) |
As stored in the card configuration (via the code editor), the field's control looks like this:
{
  "property": "picture",
  "resizeImage": {
    "width": 400,
    "height": 400,
    "fit": "cover",
    "type": "image/jpeg",
    "quality": 0.8
  }
}
With this in place, a coworker can pick any large photo and it's automatically cropped to a tidy 400 × 400 JPEG before upload — small, fast, and consistent — while the heavy original never leaves their device.
Sharper avatars
If your avatars are displayed larger, or you want extra sharpness, raise the quality towards 0.9 or increase the dimensions (for example 600 × 600). Keep in mind that both increase the stored file size.
Supported images and fallback
Resizing only happens for image files the browser can decode. Everything else is uploaded unchanged, so the feature never blocks an upload:
- Non‑image files (documents, archives, and similar) are always uploaded as‑is.
- SVG images are uploaded unchanged (they are vector images and don't need resizing).
- HEIC / HEIF photos — most notably the default format on iPhones — cannot be decoded outside Safari. When decoding isn't possible, Lime CRM uploads the original file unchanged as a safe fallback rather than failing.
In practice this rarely matters
You usually don't need to worry about the HEIC fallback:
- On an iPhone, the web client runs on Apple's own browser engine — the same one Safari uses — which can decode HEIC. So a photo picked straight from the phone's library is resized normally.
- On a Mac or Windows computer, HEIC photos that have been AirDropped, shared or otherwise transferred are usually already converted to JPEG by the time they reach the CRM.
So the original, un‑resized file is rarely what ends up stored. This section just documents the technical edge case — it isn't something you need to design your configuration around.
Resizing re‑encodes the image
Applying any resize option re‑encodes the image, so the uploaded file is a fresh copy rather than the original bytes. To keep a file exactly as the user provided it — same format, dimensions and quality — leave the whole Resize & Optimize images section unset for that field.