Hello Task!
Tasks are a way to provide functionality for running code asynchronously. Typically, when writing plugins, any action that takes longer than a normal REST request should be realised as a task. This guide will show how to use the task platform service to create a new task that will run asynchronously and display a simple toast when it has completed.
Generate a task
We will start by creating a new package named "Sleepy". The task that we will create will sleep for a period of time and return a message when it is done. We will need to generate the following:
- A translation module
- A command to invoke the task (We'll bundle this command into an action that we will add to our action bar)
- An endpoint that creates the task
- The task itself
You'll be asked to give your package a name (the default suggestion is Cool Package).
It can be named anything, but for the purposes of this guide we'll name ours sleepy.
You don't need to give the Package name or Lib name any value, just hit enter.
lime-project will give the Package name and Library name default prefixes as shown below.
Display name [Cool Package]: sleepy
Package name [limepkg-sleepy]:
Lib name [limepkg_sleepy]:
You should see a message in the terminal which will give you the option to pick the Python dependency for this package. Choose Python 3.11.
Below is my folder structure. The details will vary according to your own personal setup.
Scaffolded a new project in "/Users/My_User/Tutorials/Packages/limepkg-sleepy"
[?] Pick a python version dependency: ^3.11
   ^3.7
 > ^3.11
Note
- The prefix of the folder generated for a package is: 'limepkg'
- Unless you specified otherwise, the folder for our package should be: 'limepkg-sleepy'
Now we'll run the commands to generate the basic skeleton of what we'll need.
lime-project generate translation-module
lime-project generate command sleep
lime-project generate tasks
Now that we've done that let's begin to implement the functionality.
The command
The command will take a number as an argument and we'll call it 'timeout'.
This property represents the number of seconds that the task will be asleep for.
The timeout will be configurable from the config when it is added to the action menu.
The command class
- add
timeoutas a property to theSleepCommandcommand class. - set it as a
publicproperty and type it as anumber.
import { Command } from '@limetech/lime-web-components';

@Command({
    id: 'limepkg_sleepy.sleep',
})
export class SleepCommand {
    public timeout: number;
}
The command handler
In the command handler, we are going to use the TaskRepository to create the task.
Let's look at the autogenerated handler:
import { CommandHandler } from '@limetech/lime-web-components';
import { SleepCommand } from './sleep.command';

export class SleepHandler implements CommandHandler {
    public handle(_command: SleepCommand) {}
}
Let's modify the handler.
Steps to take
- add 'TaskRepository' to the imports from '@limetech/lime-web-components'
- add a constructor to initialize the TaskRepository
- our handle function neeeds to be 'async'
- pre-fix the url with the name of our package 'limepkg-sleepy'
- we pass in the 'url' and the 'command' to the create function in the TaskRepository.
When the command is called this handler will be invoked to handle the command and our task will be created.
import { CommandHandler, TaskRepository } from '@limetech/lime-web-components';
import { SleepCommand } from './sleep.command';

export class SleepHandler implements CommandHandler {
    constructor(private tasks: TaskRepository) {}

    public async handle(command: SleepCommand) {
        const url = 'limepkg-sleepy/task/sleep/';

        const id = await this.tasks.create(url, command);
        console.log(`Created task with id ${id}`);
    }
}
Registering the command handler
Now that we have our modified handler finished, let's use it.
We need to register our command and the command handler in the Loader component
Follow the following steps to modify the loader component and register the handler
Step 1
Add 'CommandBus, TaskRepository' to the imports from '@limetech/lime-web-components'
Import both 'SleepCommand' and 'SleepHandler'
import {
    LimePluginLoader,
    LimeWebComponentContext,
    LimeWebComponentPlatform,
    CommandBus,
    TaskRepository
} from '@limetech/lime-web-components';
import { SleepCommand } from 'src/commands/sleep/sleep.command';
import { SleepHandler } from 'src/commands/sleep/sleep.handler';
Step 2
We need to get both the taskRepository and commandBus services from the platform.
export class Loader implements LimePluginLoader {

    public componentWillUpdate() {}

    public disconnectedCallback() {}

    private get taskRepository(): TaskRepository {
        return this.platform.get(PlatformServiceName.TaskRepository);
    }

    private get commandBus(): CommandBus {
        return this.platform.get(PlatformServiceName.CommandBus);
    }
}
Step 3
Finally, let's modify the componentWillLoad function.
Success
Here's the final code for the loader component
import {
    LimePluginLoader,
    LimeWebComponentContext,
    LimeWebComponentPlatform,
    CommandBus,
    TaskRepository
} from '@limetech/lime-web-components';
import { Component, Prop } from '@stencil/core';
import { SleepCommand } from 'src/commands/sleep/sleep.command';
import { SleepHandler } from 'src/commands/sleep/sleep.handler';

// NOTE: Do NOT remove this component, it is required to run the plugin correctly.
// However, if your plugin has any code that should run only once when the application
// starts, you are free to use the component lifecycle methods below to do so.
// The component should never render anything, so do NOT implement a render method.

@Component({
    // ⚠️ WARNING! Do not change the tag name of this component unless you also
    // change the name of the package. The tag name should be
    // lwc-<package-name>-loader, e.g. lwc-limepkg-sleepy-loader
    tag: 'lwc-limepkg-sleepy-loader',
    shadow: true,
})
export class Loader implements LimePluginLoader {
    /**
    * @inherit
    */
    @Prop()
    public platform: LimeWebComponentPlatform;

    /**
    * @inherit
    */
    @Prop()
    public context: LimeWebComponentContext;

    public connectedCallback() {}

    public componentWillLoad() {
        this.commandBus.register(SleepCommand, new SleepHandler(this.taskRepository));
    }

    public componentWillUpdate() {}

    public disconnectedCallback() {}

    private get taskRepository(): TaskRepository {
        return this.platform.get(PlatformServiceName.TaskRepository);
    }

    private get commandBus(): CommandBus {
        return this.platform.get(PlatformServiceName.CommandBus);
    }
}
If you've finished all three steps with the loader component, then all frontend coding is done.
Let's go ahead and build the project.
The endpoint
When we ran 'lime-project generate tasks' there was an endpoint generated.
The file should be in:
limepkg-sleepy/endpoints/task_endpoint.py
Steps for modifying the endpoint
Step 1
This file contains some autogenerated code that we can replace with our own.
import lime_webserver.webserver as webserver
import logging
from flask import request
from ..endpoints import api
import lime_task


logger = logging.getLogger(__name__)


class SendSmsExample(webserver.LimeResource):
    def post(self):
        """Publish a task
        task expects a json object containing a `message` key
        with the message to be sent to every company and
        an `ignore_errors` key.
        """

        payload = request.get_json()

        return lime_task.send_task(
                limepkg_sleepy.tasks.tasks.send_sms,
                self.application,
                payload['message'],
                payload['ignore_errors']).to_dict()


api.add_resource(SendSmsExample, '/task/send-sms')
Step 2
We use marshmallow for our schemas, so we'll import 'fields' from marshmallow and we'll use the decorater 'use_args' from flaskparser
Step 3
- Start by declaring
sleep_argsthis will make use of the 'fields' import from 'marshmallow' and allow us to pass in thetimeoutparameter as an argument - Within our class we'll use the
@use_argsdecorator - Our
postfunction expectsargs
import lime_webserver.webserver as webserver
import logging
from flask import request
from ..endpoints import api
from marshmallow import fields
from webargs.flaskparser import use_args
import lime_task


logger = logging.getLogger(__name__)
sleep_args = {
"timeout": fields.Number(required=True)
}
class SleepyTaskHandler(webserver.LimeResource):
@use_args(sleep_args)
def post(self, args):
return lime_task.send_task(
'sleepy.tasks.tasks.sleep',
self.application,
args['timeout']).to_dict()
Step 4
This shows our task_endpoint.py in its final state
import lime_webserver.webserver as webserver
import logging
from flask import request
from ..endpoints import api
from marshmallow import fields
from webargs.flaskparser import use_args
import lime_task


logger = logging.getLogger(__name__)
sleep_args = {
    "timeout": fields.Number(required=True)
}


class SleepyTaskHandler(webserver.LimeResource):
    @use_args(sleep_args)
    def post(self, args):
        return lime_task.send_task(
                'sleepy.tasks.tasks.sleep',
                self.application,
                args['timeout']).to_dict()
api.add_resource(SleepyTaskHandler, '/task/sleep/')
Once you've finished the 4 steps for the endpoint we can move on to the task.
The task
The task itself is really simple, it will just sleep for the given amount of time and then return a message.
As this is only for the purposes of this tutorial, we can remove all of the autogenerated code in sleepy/tasks/tasks.py and add our own.
from lime_task import task
import time

@task
def sleep(app, timeout):
    time.sleep(timeout)

    return "Slept for " + str(timeout) + " seconds"
Installation and configuration
Note
All coding should be done now and we can go ahead and install our package into a solution. Since our package is not published we cannot simply add it by referencing limepkg-sleepy, we'll need to use the local path to the package.
If you recall I have mine in my Tutorials/Packages folder so my command for adding the package to my local solution is this:
poetry add ~/Tutorials/Packages/limepkg-sleepy
Once that's done you can run your solution and let's configure it!
Add our command to an action in the action bar
To add an action from which we can trigger the command and create our task, we need to configure the general view for the one of the limetypes in lime-admin.
Step 1
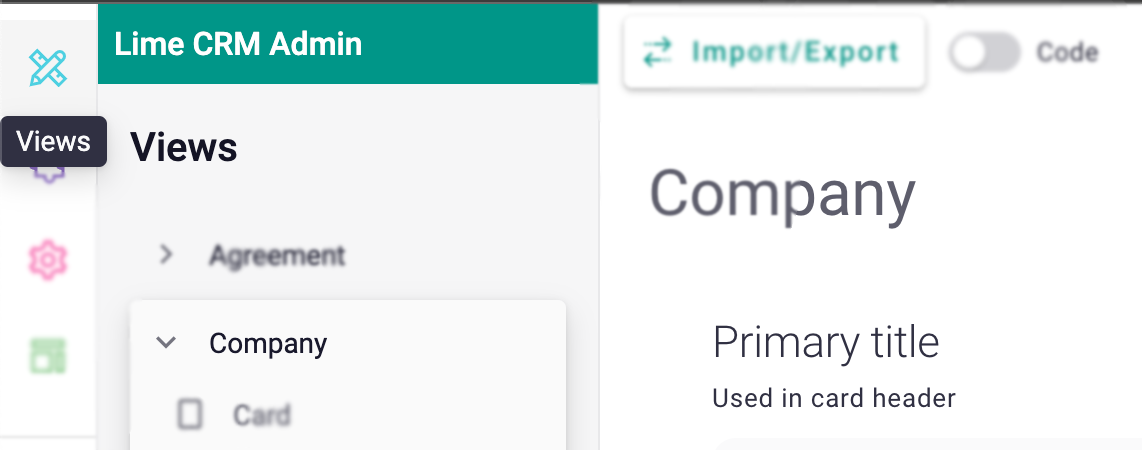
We'll open the general view for the 'Company' limetype.
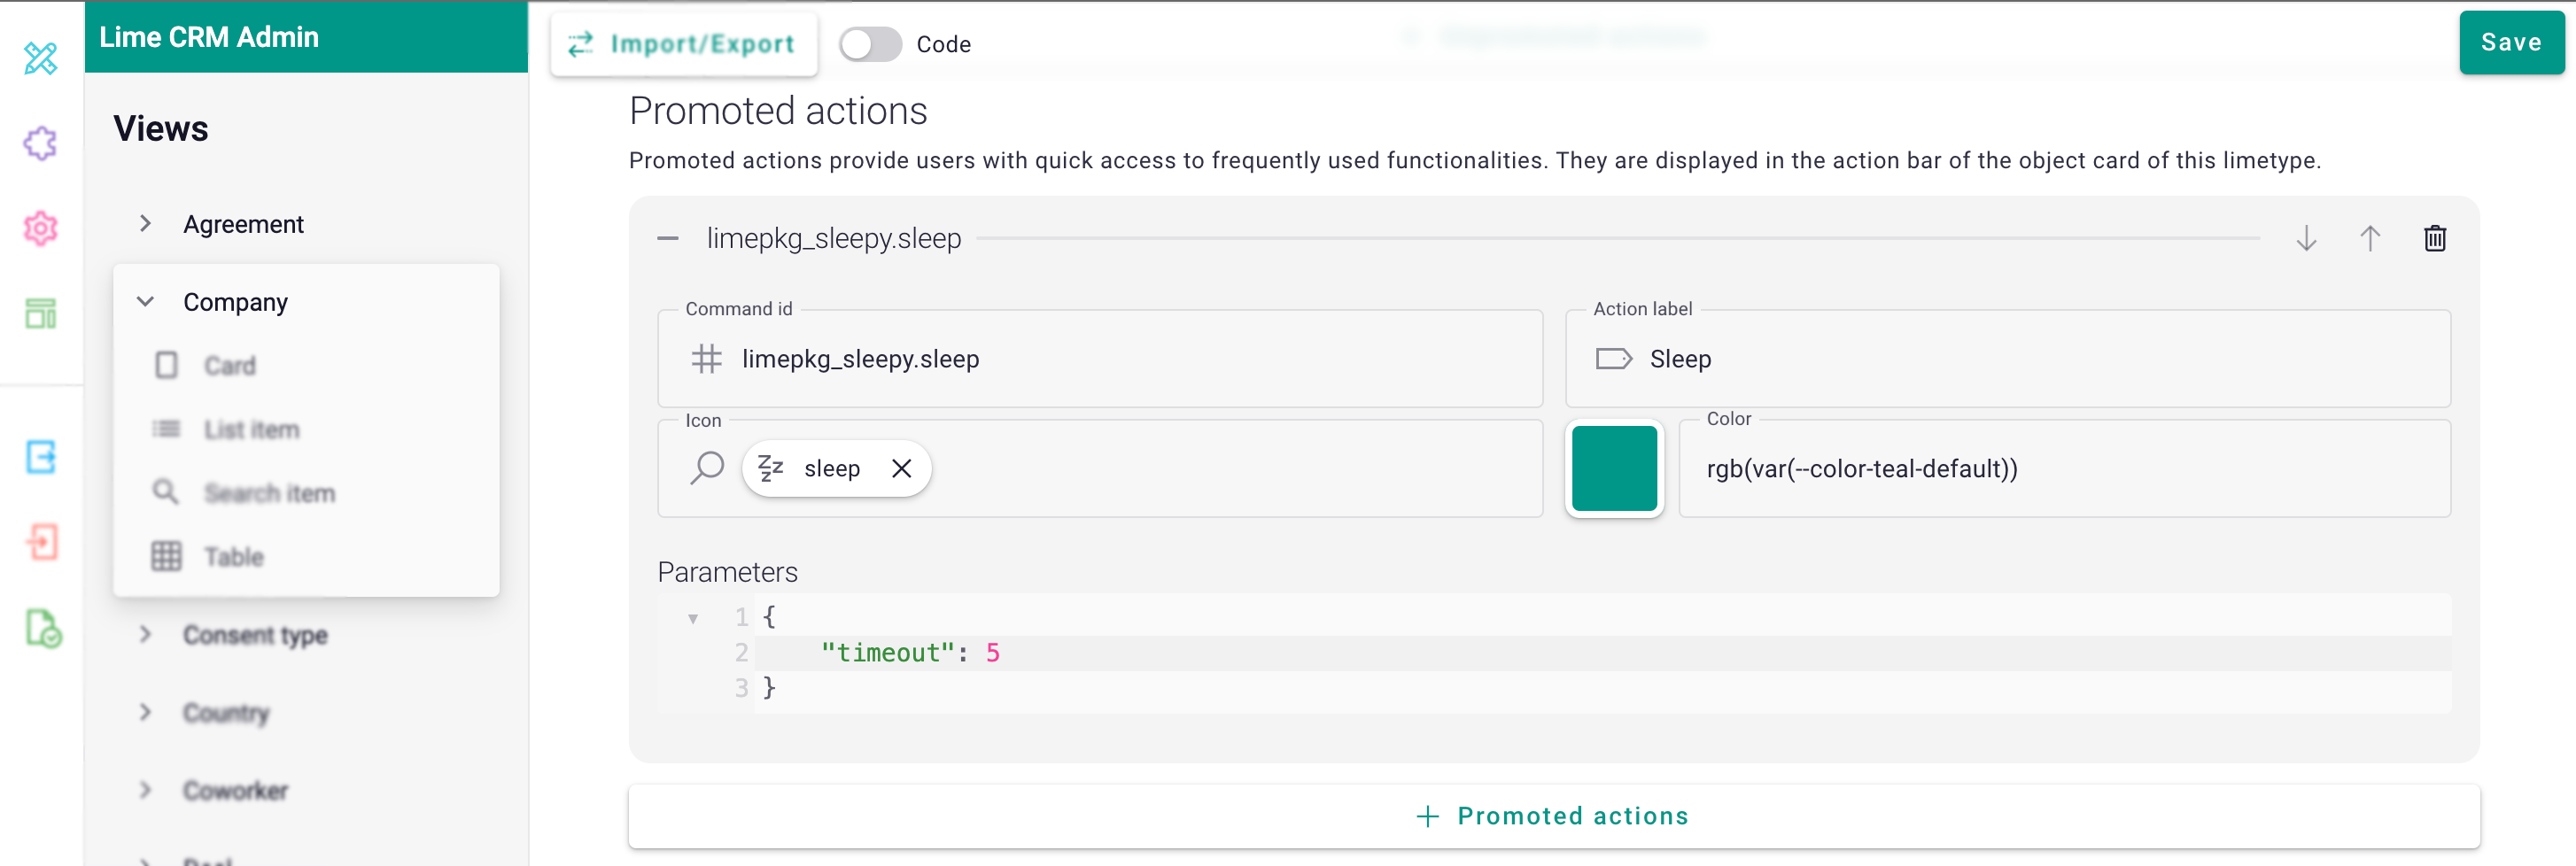
Step 2
Scroll down to, and click the
+ Promoted Actions button to configure the new action.
Label, Icon and Color are not required, but we'll add them anyway.
The important ones for this tutorial are the Command id and Parameters
We'll set the following attributes:
- Command id: limepkg_sleepy.sleep
- Parameters: {
"timeout": 5
}
Click the green Save button. This will add our action and configure our task to sleep for 5 seconds.
Testing our plugin
We can now go ahead and test our plugin.
Navigate to the table that has the action added to the menu, we added it to the 'Company' limetype.
A promoted Action will show on the Object Card of the limetype for which it was configured, so go ahead and click on one of the companies.
Our action should show on the Company Card:
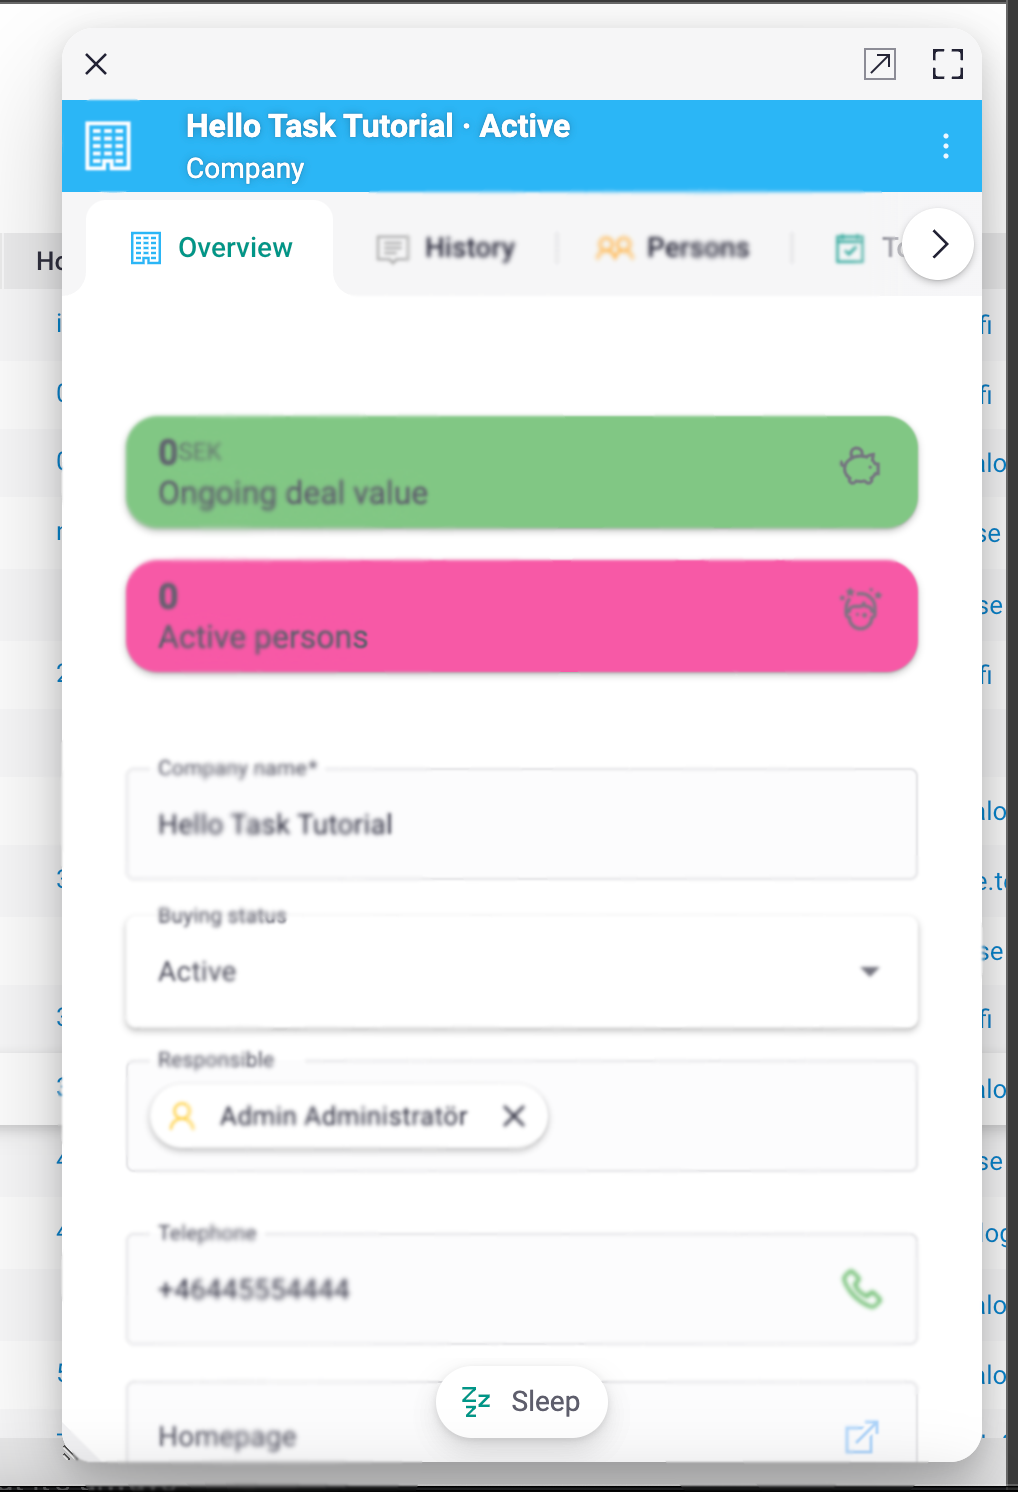
Click the action.
A notification should be displayed indicating that the task is about to be created. Unless it is canceled, a new notification should be displayed telling us that it was created successfully. Depending on how much work is being done on the taskhandler, the task might have been queued up so there is no way of knowing how long it will take until it returns a result. After a while though it should return and a new message should be displayed with the result of the operation.