Configuring the Start Page
This guide aims to provide an introduction to configuring the start page in Lime CRM Web Client.
This feature replaces the start page grid, which will not be supported in future versions of CRM.
Some of the introduced features are: multiple start pages, configuration user interface, "just looks good" layout, and new widgets.
The new start page is available behind the feature switch useMultipleStartPages from version 2.372.0 of lime-crm.
Creating a Starting Configuration
When you come to the new start page configuration page, you may not have any configurations. But you can create one with ease, automatically based on your existing configuration of the old start page grid:
- Go to Lime CRM Admin ➡ System ➡ Start Pages.
- Press "Save" and a starting configuration will be generated automatically.
This is what happens when the new start page config is auto-generated:
- Every widget in the configuration found in Lime CRM Admin ➡ Start Page Designer is added to your new configuration.
-
Info Tiles that were present in the deprecated dashboard slot will also be added to the new configuration.
Note
The new start page does not offer distinct configurations for mobile or tablet. Therefore, any widget which has previously been "hidden" on a certain screen size is now included in the new config and will be visible on all devices.
-
The system does its best to pick the best widget size and a correct order, but you may still need to manually adjust the order and size of widgets.
Note
The new start page tries to avoid empty holes between widgets. This may result in widgets moving around between different screen widths. Simply resize your browser window to check the result at different screen widths.
-
The Object Explorer Widget and Salespipe Widget are added to your starting configuration. (Replacing the old todo widget and salespipe widget.)
- Anything that might have been present in the deprecated dashboard slot is not included in the auto-generated config (except Info Tiles), but can be added manually.
Info
If you run into any errors, first have a look in the Troubleshooting section below.
Widgets
We call the things that are placed on the start page "widgets". (Technically they are web components, and could be used in other places too. But since everything in the web client consists of web components, and each widget will typically consist of several other web components too, we use the term "widget" to mean "a web component that you have configured to show up on the start page". It's simpler that way 😉)
You can think of them in a similar way that widgets on your phone work: You have an app where you can do everything. But the app may also have one or more widgets that you can add to your home screen for easy access and overview of the most common features.
Built-in Widgets
Lime CRM has a few widgets that are available out of the box, and can help customizing a start page for different customer needs. Today, we have the Object Explorer Widget, and the Salespipe Widget. These two replace the old Todos and Salespipe components which used to be a hard-coded integral part of the old start pages; none of which is supported anymore and therefore shouldn't be used. The new ones offer better design, as well as more features for a better customizability.
Additionally, Lime CRM comes with another inbuilt widget called Info Tile. Info tile is technically an add-on, which is installed by default on all CRMs for free. So any customer has access to this add-on too. It can automatically calculate aggregated numbers from several lime-types which meet specific criteria, and display them gracefully on the start page; for example the "total value of all won deals this month".
However, your power for creatively customizing a start page doesn't stop here. Of course you can build your own widgets witch custom functionality, and add them to a start page when there is budget for it. But to make your life easier, and your work faster, we have made a few other components which can be used for customizing a start page. For example the Shortcut widget, which we will talk about further down.
Object Explorer Widget
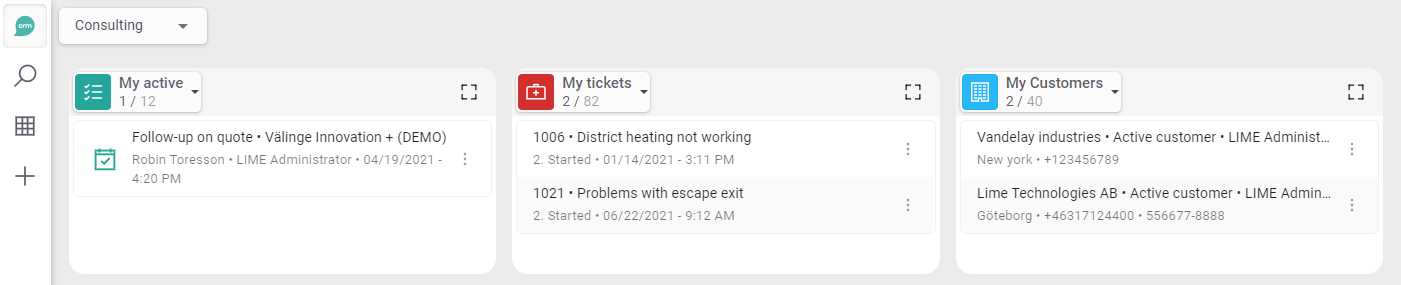
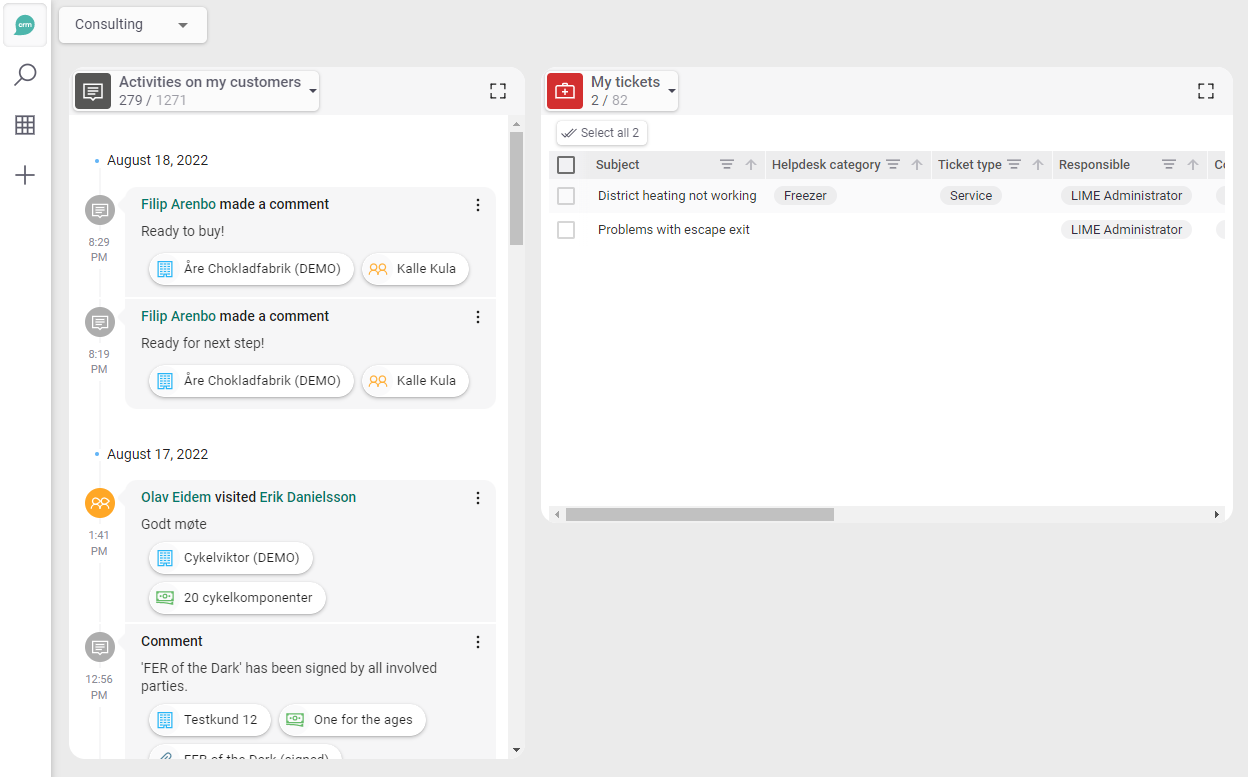
The Object Explorer Widget is used to get a small, convenient list of things, right where you start your day. By default, it is used for To-do:s but it can be used for tickets, checklist items, project activities or anything you might want. It is great for when an info tile is not enough and you need more information.
Adding the Widget to the Start Page
Add the Object Explorer Widget by typing limec-object-explorer-widget in the Name field.
Configuring the Widget
Select which limetype to use in the Properties field and add a sorting and a default filter set if you like:
{
    "limetype": "todo",
    "filterId": "webclient.todo.myactivetodos",
    "orderBy": {
        "name": "starttime",
        "direction": "DESC"
    }
}
You can even specify which view to use. (List view is the default.)
{
    "limetype": "history",
    "view": {
        "name": "limec-history-view"
    },
    "orderBy": {
        "name": "date",
        "direction": "ASC"
    }
}
or
{
    "limetype": "helpdesk",
    "view": {
        "name": "limec-table-view"
    }
}
Info
Some features of the table view such as filtering and sorting are not supported in the Object Explorer Widget.
Salespipe Widget
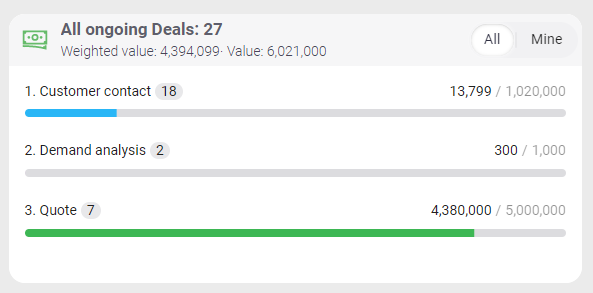
The salespipe is the salesperson's and sales managers' tool to keep track of all the active deals in different steps in the sales process.
The user can choose to show all deals or only their own deals by clicking the buttons in the upper right corner. At the very top, in the header of the salespipe, you get information about the total number of active deals, total weighted value and total deal value. For each grouped deal status, you receive information about the number of deals, weighted value and total deal value. You also get a progress bar for each status which indicates how much of the total value of all active deals in the salespipe is made up of deals in this particular status.
Adding the Widget to the Start Page
Add it by typing limec-salespipe-widget in the Name field.
Configuring the Widget
The configuration of the Salespipe Widget is done via Lime CRM Admin ➡ Settings ➡ Salespipe. Click “Show code editor” to access the json configuration.
Example configuration:
{
  "deal": {
    "name": "deal",
    "properties": {
      "company": {
        "name": "company"
      },
      "expecteddate": {
        "name": "expecteddate"
      },
      "name": {
        "name": "name"
      },
      "probability": {
        "name": "probability"
      },
      "responsible": {
        "name": "coworker"
      },
      "status": {
        "name": "dealstatus",
        "options": [
          "contact",
          "requirement",
          "tender"
        ]
      },
      "value": {
        "name": "value"
      },
      "weightedvalue": {
        "name": "weightedvalue"
      }
    }
  }
}
The configuration consist of a number of sections:
- name (“deal” in the example above). This is the database table name for the deals to show in the salespipe.
Under the properties section:
- company → name: (“company” in the example above). The field name for the relation to the company table.
- expecteddate → name: (“expecteddate” in the example above). The field name for the expected date when the deal will be closed. Must be a datetime field, usually year/quarter.
- name → name: (“name” in the example above). The field name for the name of the deal. Must be a string.
- probability → name: (“probability” in the example above). The field name for the probability of the deal. Must be a decimal field and percent type.
- responsible → name: (“coworker” in the example above). The field name for the relation to responsible coworker for the deal. Must be a relation field.
- status → name: (“dealstatus” in the example above). The field name for the status of the deal. Must be an option field.
- status → options: List of the options for the field
dealstatusthat should be shown in the salespipe. The options should be written as optionkeys and ordered according to the sales process (last active stage of the sales process should be the last option). Exclude end-stages, like "Lost" and "Won". - value → name: (“value” in the example above). The field name for the total value of the deal. Must be a decimal or integer field.
- weightedvalue → name: (“weightedvalue” in the example above). The field name for the weighted value of the deal. Must be a decimal or integer field.
Shortcut widget
The shortcut widget is as simple as it sounds; a shortcut to wherever you want. This component is available in Lime Elements and offers a few nifty features which can be used when creating a custom and smart widget with some dynamic built-in logic. You can read more about the Shortcut component and it's props in Lime Elements documentations
However, because of the way the original component is designed, you can easily use some of its properties and set hard-coded icon, color, label and a destination URL of the shortcut, directly via Lime Admin's interface. This means, you don't have to create a custom component, and pretty much no deep coding skills is required to setup a functioning simple shortcut, and link it to somewhere.
Here we show you how to do so…
Adding the Widget to the Start Page
Simply add the Shortcut component by typing limel-shortcut in the Name field. Also choose the "Small square" for its size. Choosing bigger sizes is not recommended.
Configuring the Widget
The widget has some properties that can be configured via Lime Admin:
label: A text that will be placed below the shortcut. If too long, it will be truncated.icon: The icon of the shortcut.link: The destination URL that the shortcut will go to. Thelinkhas a few parameters which you need to configure.href: The url the link should point to. !!! tip You can link to locations within the CRM too. For example/client/object/deal/1001would take you to the deal with id 1001.title: What you write as title is read by assistive tech and shown as a tooltip when the link is hovered. It can be used to provide additional information about the link. It improves accessibility both for sighted users and users of assistive technologies.target: Defines where the links should be opened, for instance in a new browser tab. See Mozilla's docs for more info. !!! warning It is extremely important NOT to change thetargetfor internal links which lead to somewhere within the CRM! Only in rare cases (typically external links), it might be ok to set thetargeton_blank.
Example configurations:
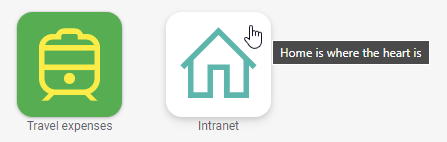
{
    "label": "Intranet",
    "icon": "home",
    "link": {
        "href": "https://www.lime-technologies.com/",
        "target": "_blank",
        "title": "Home is where the heart is"
    }
}
And of course you can give the Shortcut some pizzazz using some nice colors. For this you will have to use the provided CSS variables, and setting them as style:
styleThe icon color and background color can be controlled using "--shortcut-icon-color" and "--shortcut-background-color". Default background color is white, and icon color is dark grey.
{
    "label": "Travel expenses",
    "icon": "train",
    "link": {
        "href": "/client/object/company/6437",
        "title": "Log travel expenses here"
    },
    "style": {
        "--shortcut-icon-color": "rgb(var(--color-yellow-default))",
        "--shortcut-background-color": "rgb(var(--color-green-default))"
    }
}
Adding Other Widgets to Your Start Page
To add your widget: enter the name of the component, choose an appropriate size, and –depending on the component– add any required properties.
Most widgets are provided by Add-ons. That means that each add-on is responsible for naming and specifying necessary configuration. So if you wonder "which properties can I add to the KPI widget?", you should look in the documentation of the KPI add-on.
Layout design tips
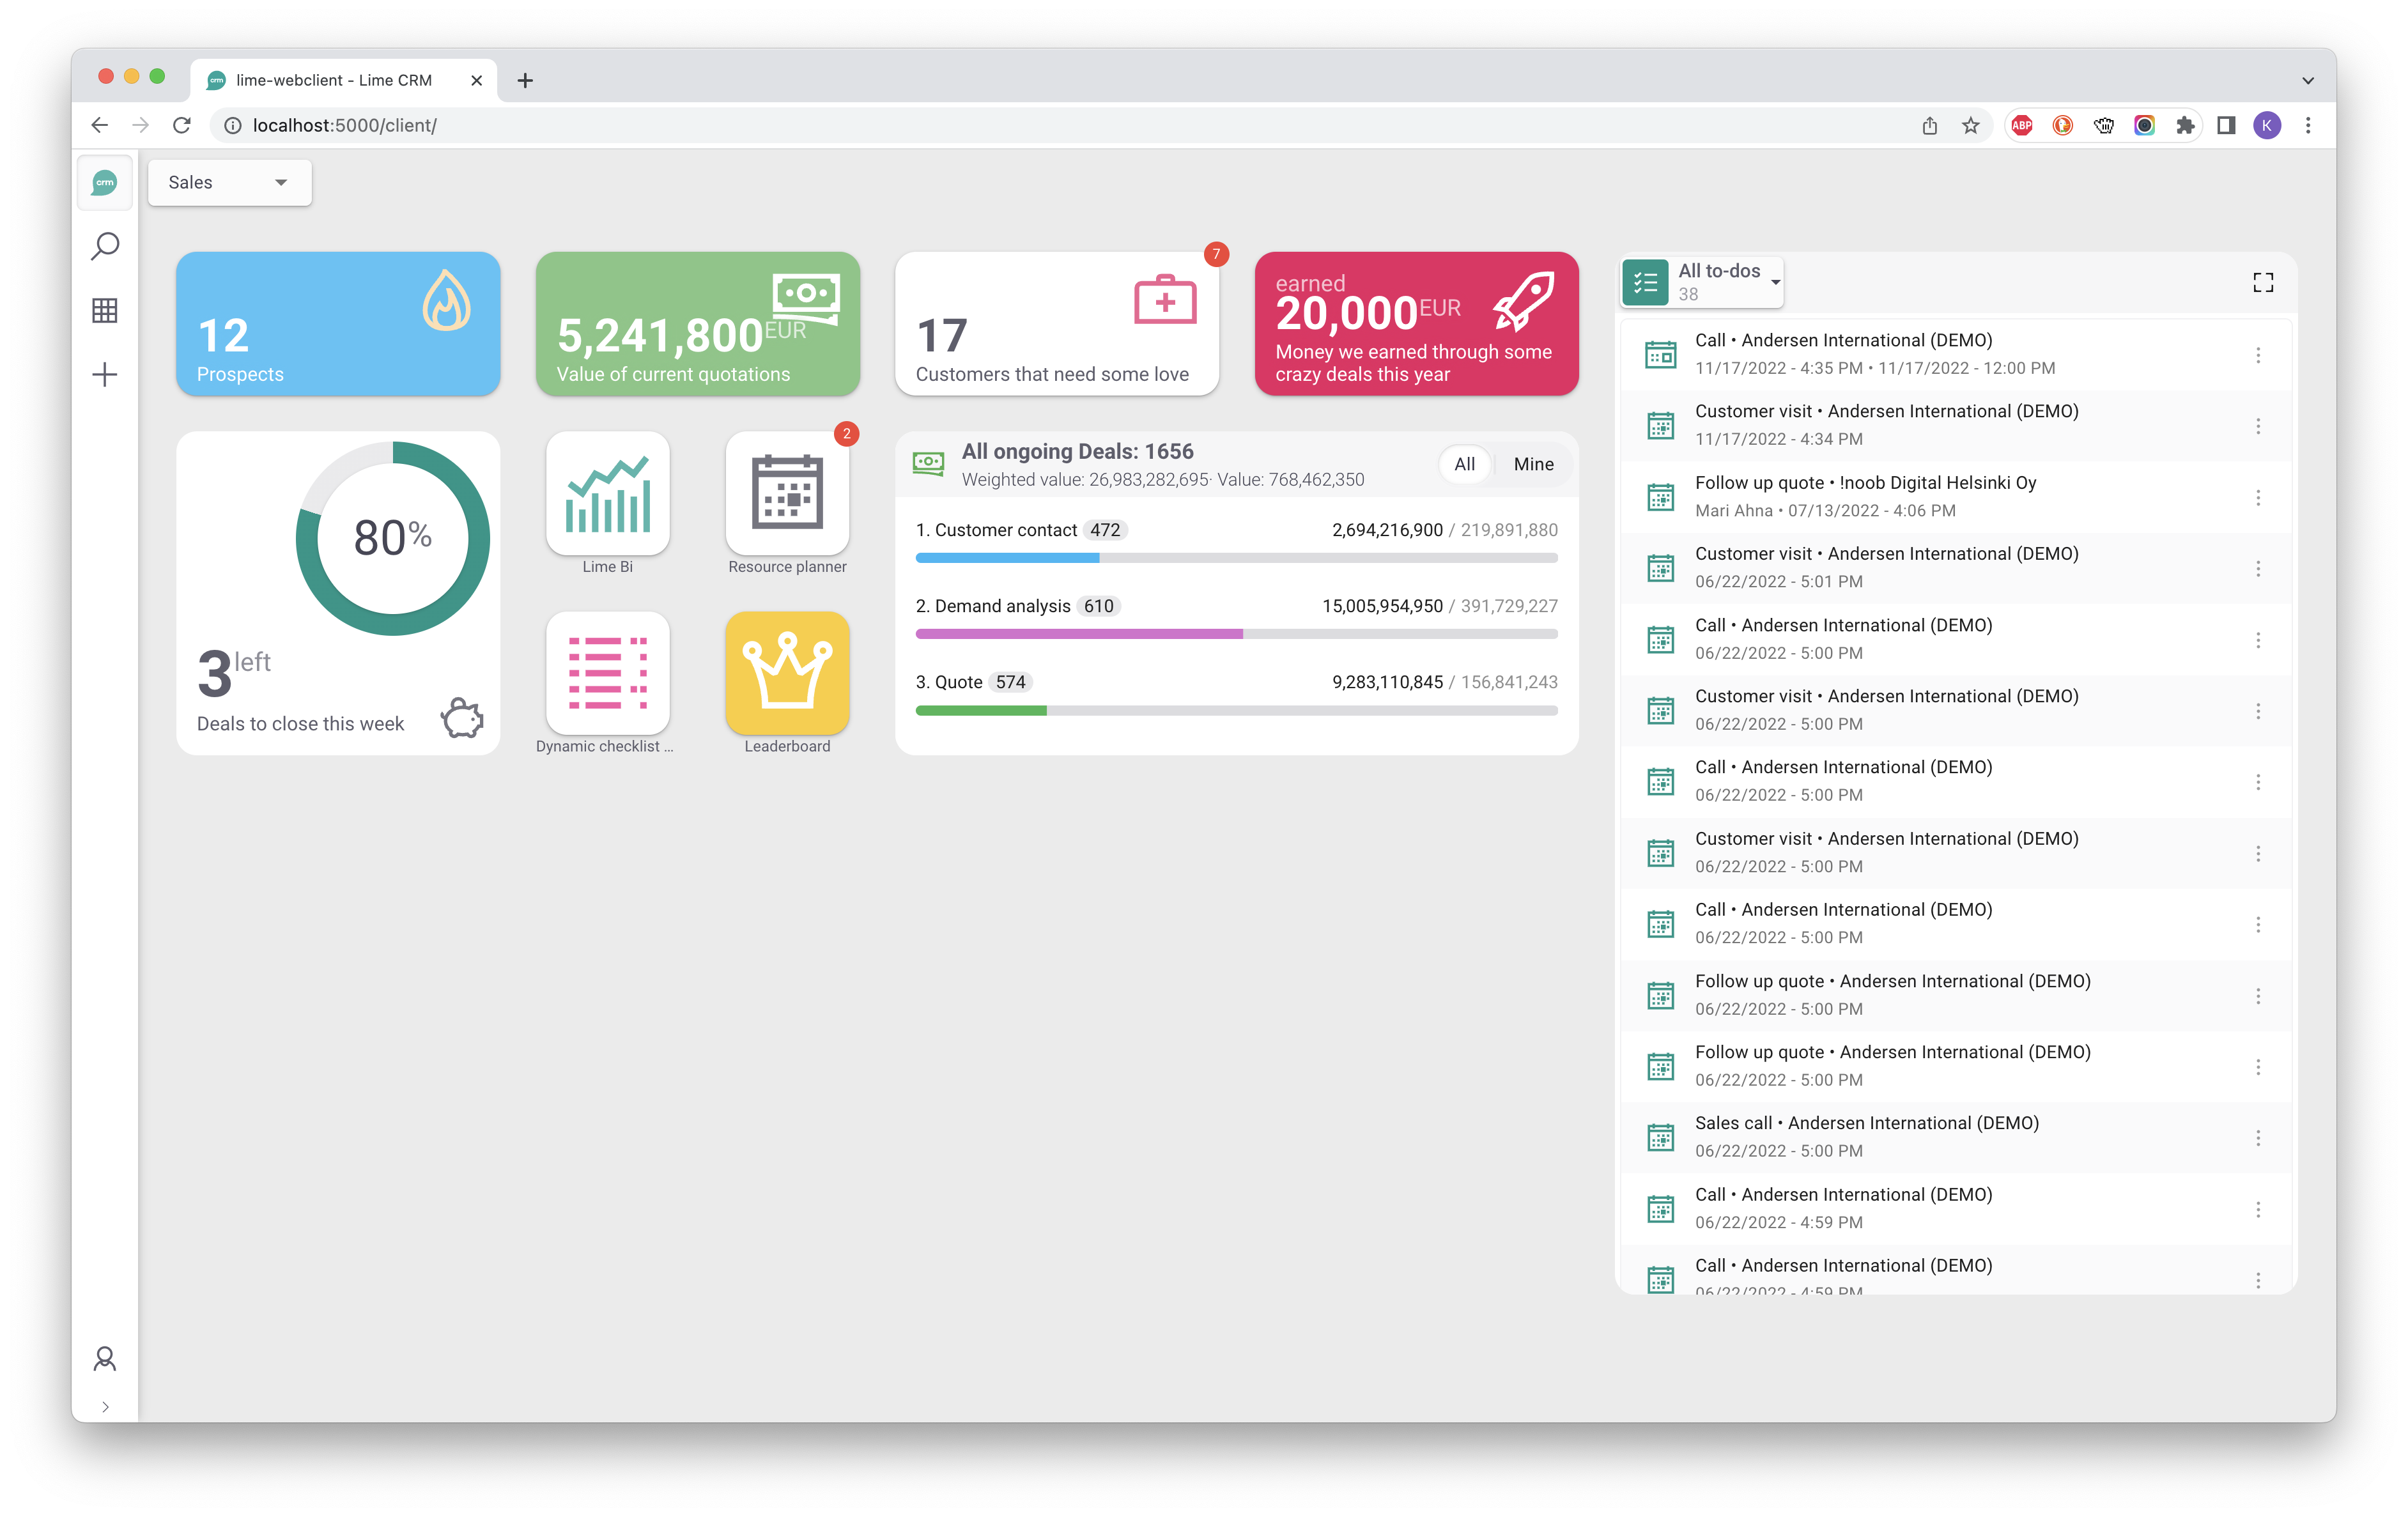
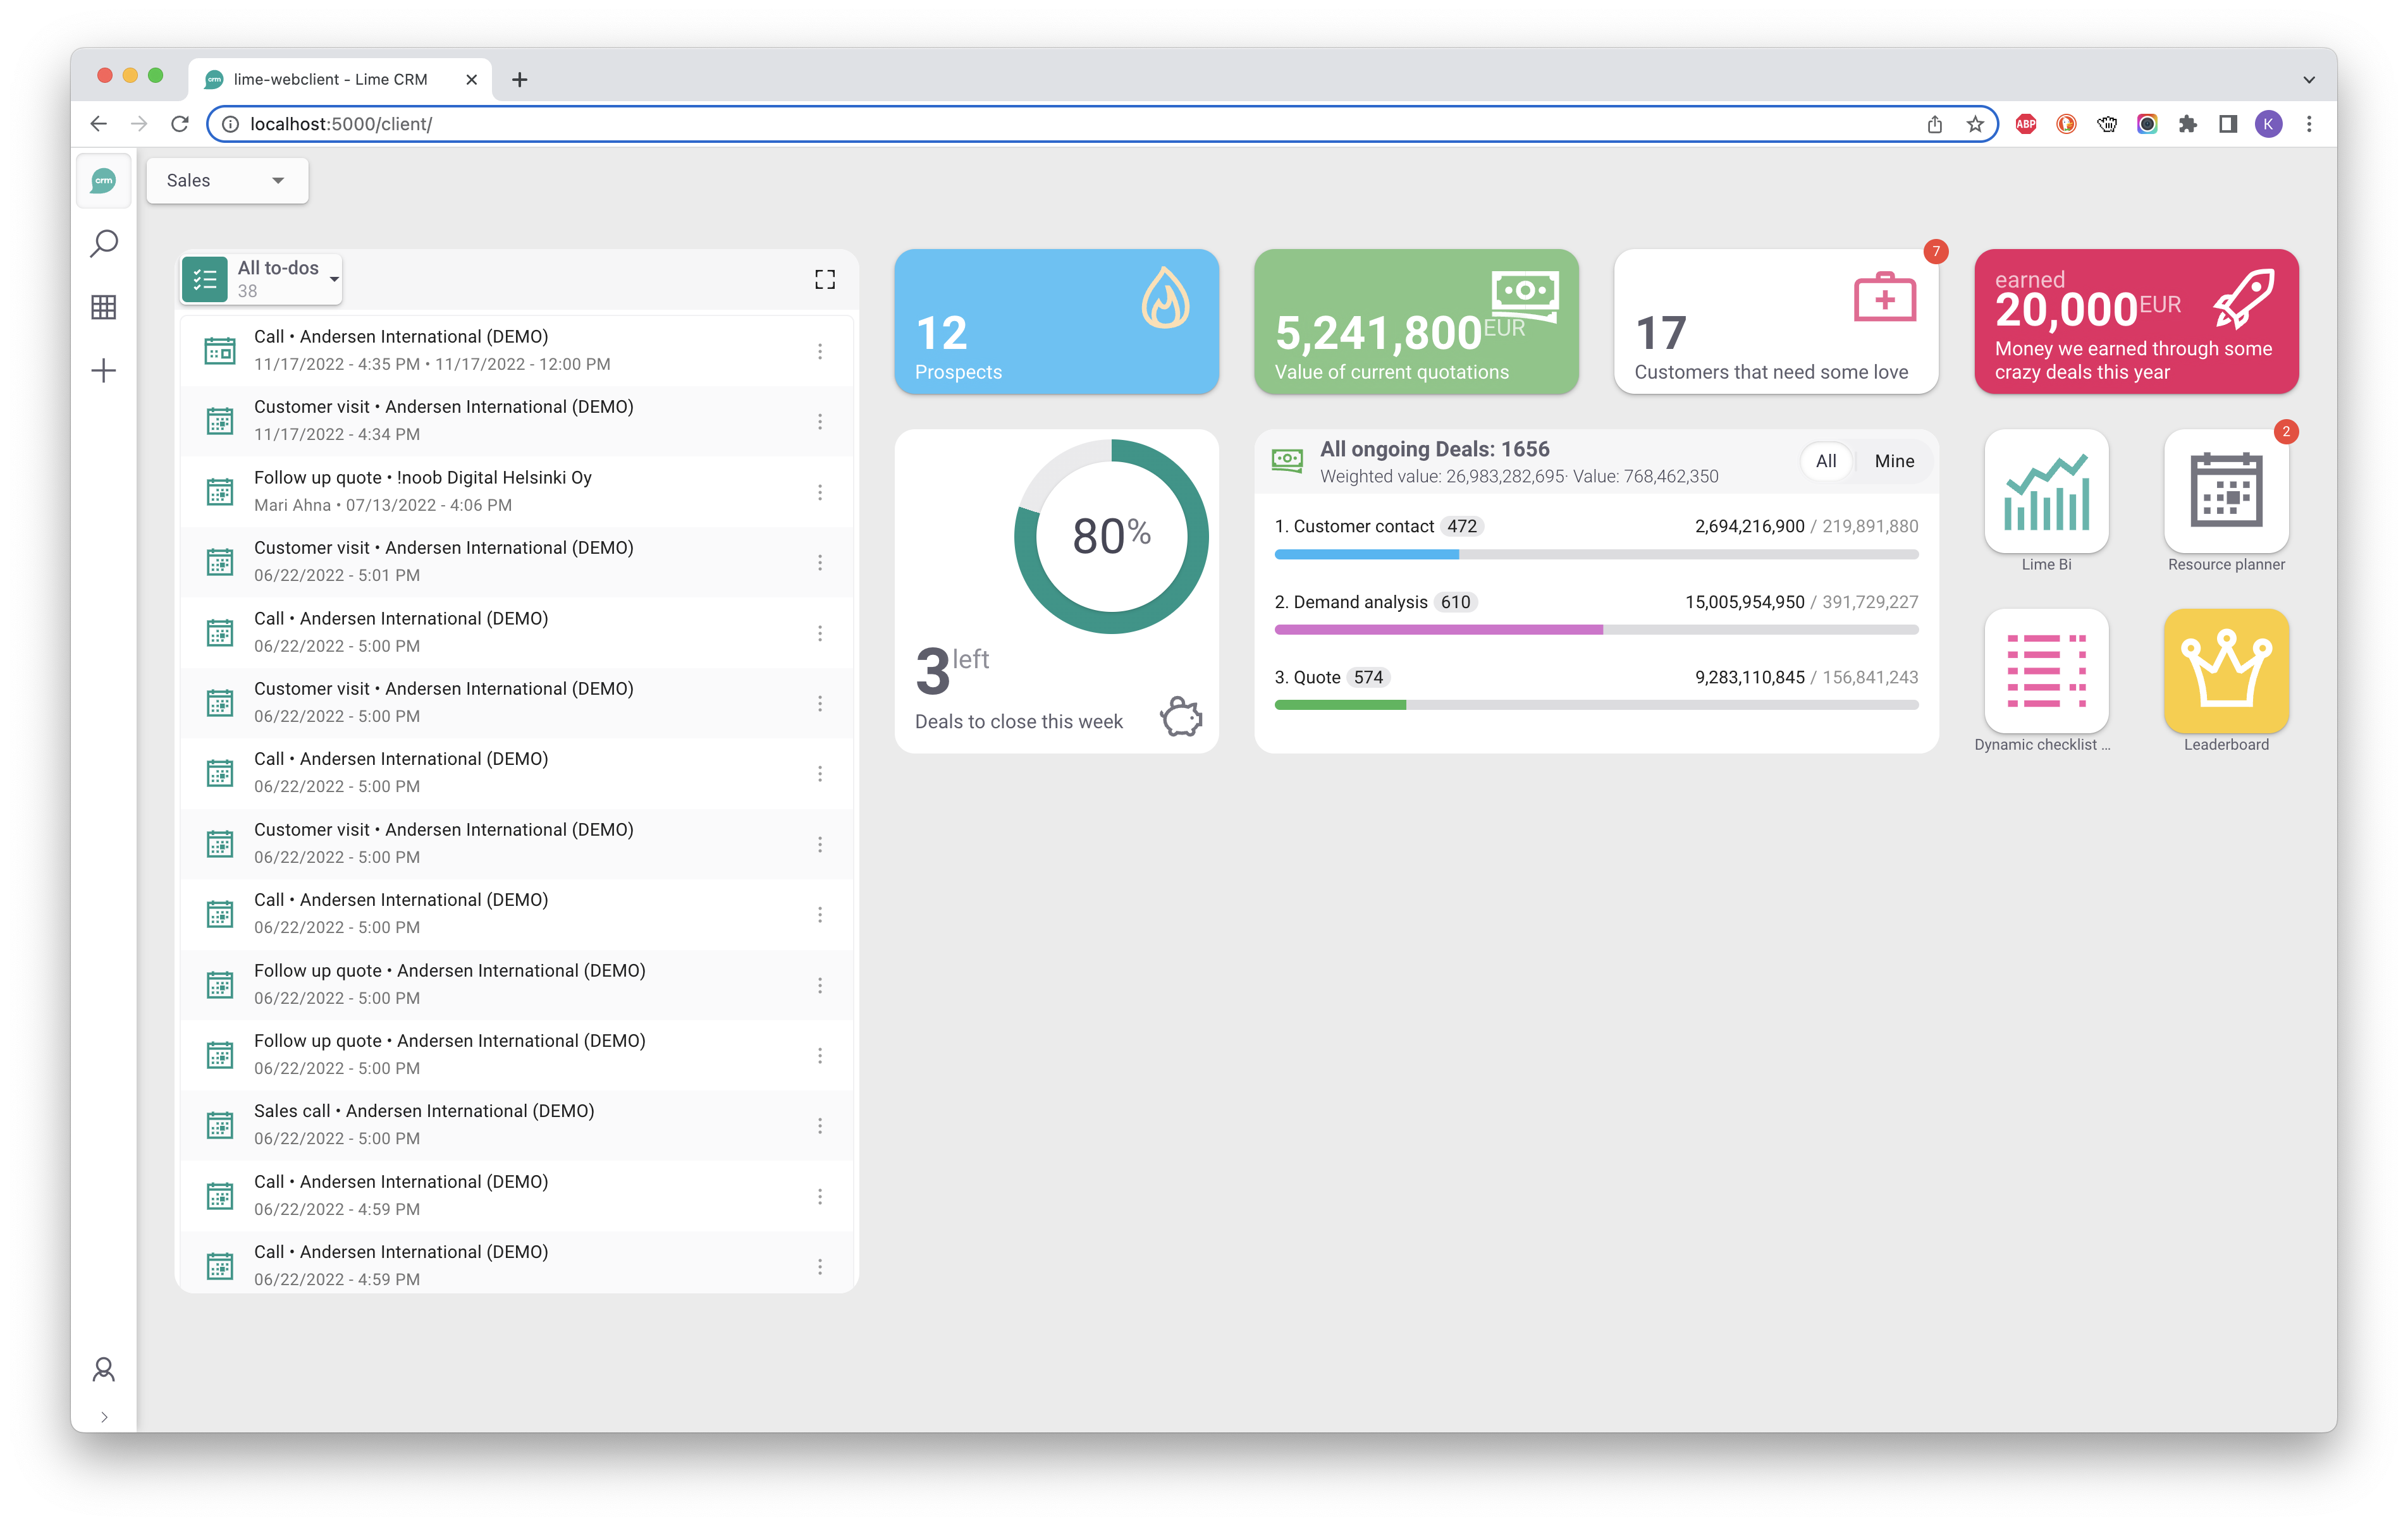
- Do not feel you have to place all info tiles in one row on top of the start page. Try to come up with new creative layout solutions. You have a lot of power at your hands; use it creatively!
- Do not place Object Explorer widgets on the right side of the screen. The reason is that the floating card (or as known with its old name, the "Related view") will open up there on the right side. It will be covering the widget and its content. Such a layout design will force the end-user to close the floating card all the time, to be able to click on the next thing in the explorer widget.
In the examples below, when the Object Explorer Widget for To-dos is placed on the left side, users will have an easier time, clicking on to-dos one by one, without the need to close the floating card. Rest of the widgets are most probably less used, or go to other places.
| Don't | Do |
|---|---|
 |
 |
Multiple Start Pages
You can add as many start pages as you like. A typical use case is that you want one start page per department; Sales, Service Desk, Field Service, Management, Consulting, etc. Another use case could be to have an "About Lime" page with links to user training material, how to file tickets, service disruptions (specific for a solution), etc.
Localizing Start Pages
If you would like to localize your start pages, this is possible by providing a localization file and enter the localization key as the name of the start page.
Read more on how to do this in the chapter Translate sections, start pages, variants and more
FAQ
How can I figure out the names of all widgets?
Which widgets you have available depend on which add-ons you have installed. The two built-in widgets are:
limec-salespipe-widgetlimec-object-explorer-widget
Read above on how to configure these.
The names of some other popular widgets are:
-
Infotiles Full documentation
Example configuration:
Name:
infotiles-tileProperties:
{ "config": "Prospects" } -
Example configuration:
Name:
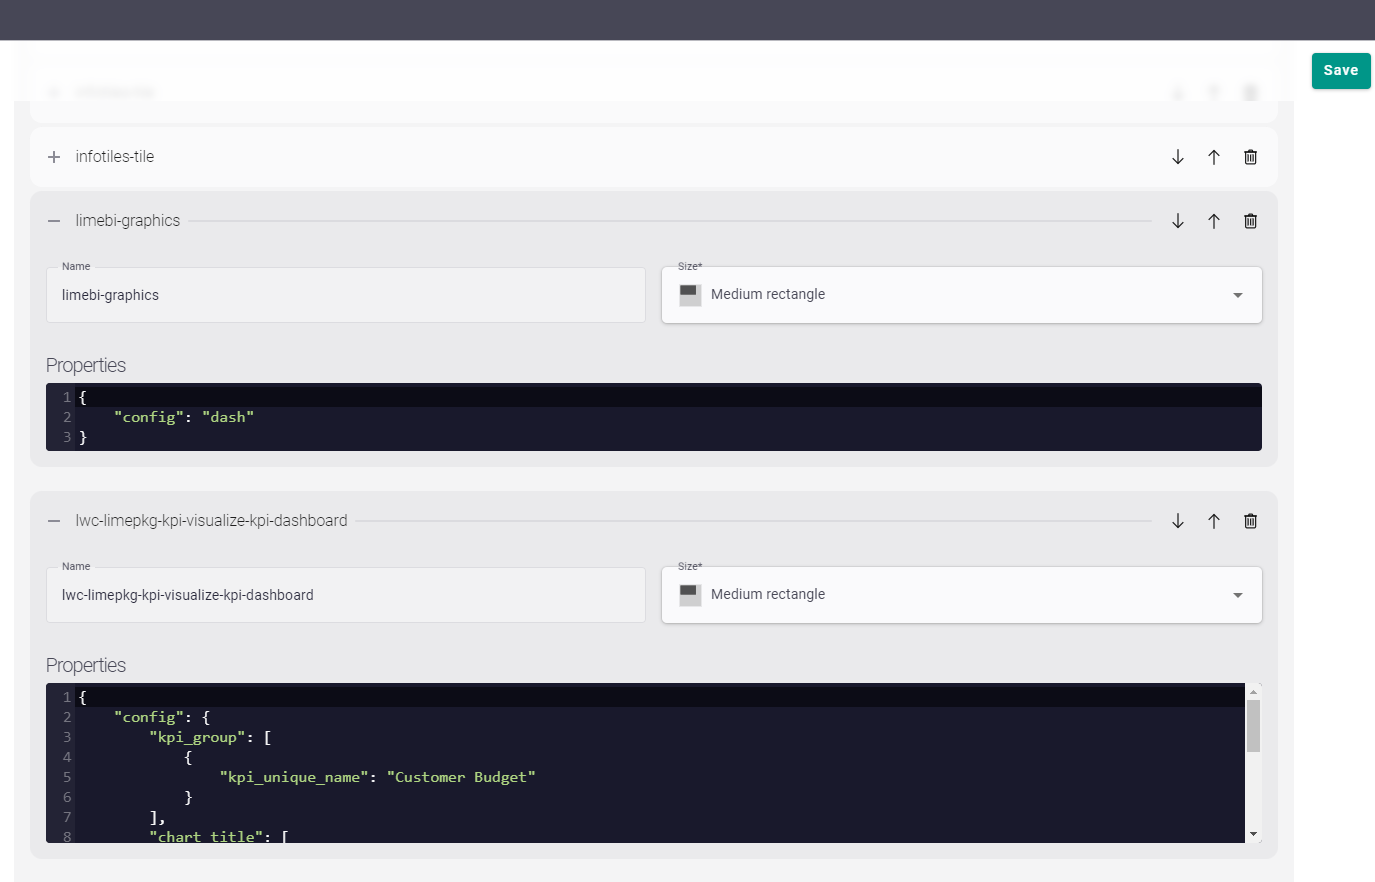
lwc-limepkg-kpi-visualize-kpi-dashboardProperties:
{ "config": { "kpi_group": [ { "kpi_unique_name": "Customer Budget" } ], "chart_title": [ { "lang": "sv", "text": "Kundbudget" }, { "lang": "en", "text": "Customer Budget" } ] } } -
Lime BI Full documentation
Example configuration:
Name:
limebi-graphicsProperties:
{
    "config": "dash"
}
Troubleshooting
I get "_schema": ["Invalid input type."] error when I try to create a starting configuration
We do not know what is causing this but the work around it to add each widget one by one.
Info tiles have not been migrated
If the info tiles configuration was not present in the configuration of the the old start page, they will not show up on new the start page. Chances are that your info tiles were only present in the so called "dashboard slot". If so, they need to be manually added to the new start page.
My custom widget does not show
First, make sure you typed the name and properties correctly. If it was present in the old start page, have a look in that configuration as a cheat sheet. There have been occasions where the "config": {} part has been missing. Make sure that is not the case.